I've now been working on this project for two weeks, and it's really taking shape. The camera is essentially two boxes, nested together (see previous post for fun historical info). Both sides are complete (minus the finish coat, not sure what that's going to be). I designed and constructed the first film holder, which holds a single negative on each side, and put together the ground glass insert which fits into the same slot the film holder goes into and which the image is focused upon. The holders have been by far the most complex items to design and build. Each consisting of several layers of very thin wood slowly glued together to form a rail system where film is inserted behind a removable darkslide (which stays in place until the moment of exposure). I've also finished building the aperture system. Because it's a single element lens the apertures have to go in front of the lens roughly 1/7 the focal length. I designed a card system where each card has a different hole aperture drilled/cut into it. I merely slip the aperture I want into a slot I cut into an extension tube that fits snuggly over the lens (you'll see in the pictures below). It's been designing, constructing, designing, constructing, repeat for awhile now. I think most of that is finished and now it's time to move into the darkroom projects (or my small bathroom which will have some unique alterations). Since I'm doing the entire process, from camera/lens construction to film/printing paper manufacturing I had to hunt down a chemical supply house and labware supply house.
Not being a chemist it's been an interesting two days making a grocery list of chemicals I need, from silver nitrate to potassium dichromate. There's about 15 different chemicals I need, some are benign like milk lactose, while others are a bit nasty. Not ever having a formal chemistry class it's been more than helpful having a very smart wife who can not only tell me how many oxygen atoms happen to be in sodium sulfite but can write out the chemical structure and tell me what happens when it's mixed with anything else on my list. She is one smart cookie! The funny part is I have to fill out a DEA form in order to get some of these, not sure what potassium iodide is used for other than to coat photographic paper with?
Initially I wanted to do this as a fun camera project, to build something that has real historical significance to my chosen career, a reaction to the ever increasing speed of digital media. I wanted to see if I could hand produce every aspect of the photographic process, from camera and lens to the negative and final print. Totally analog. To slow down each process to it's foundation of conception. When the negs take 4 hours to produce and dry, have to be shot within a few days, and where developing alone takes 2-3 hours (it's not a printing-out process, but is developed in a solution of Gallic Acid) I thought it would force me to see photography and the way I look through the lens in a new way. It has. Photography as an artistic medium is older that modern painting, yet the technology that produces it continually evolves whereas a painter today is essentially using 500 year old techniques. I noticed something interesting the other day, something we all do now, we look at the back of the camera after every shot. We now expect instant results and I truly think this dulls the external creative eye. How many times have you really taken the time to look, to watch and absorb the scene before you. Slow down sometimes, it opens new creative pathways. Stay tuned, more to come...
Process picture time!
(not in construction order, sorry)
 |
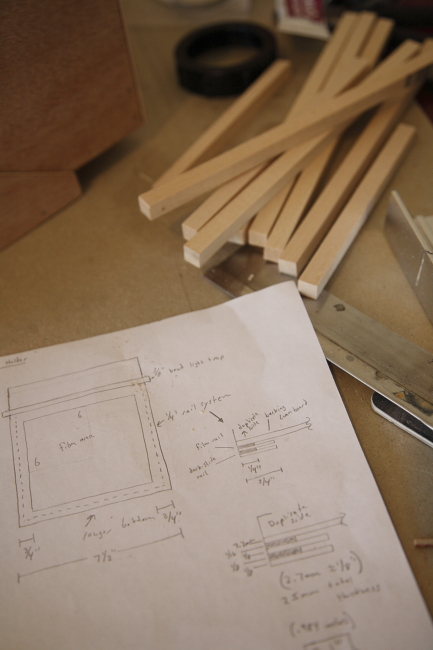
| Laying out wood and designs for the film holder |
 |
| More film holder work |
 |
| Attaching the lens board to the front box |
 |
| Prepping the front box for black paint on the inside, the rear box is standing on end, you can see the film slot. |
 |
| All the layers of the film holder |
 |
| It took three days to fully complete the film holder, I hope the others don't take as long, sheesh! |
 |
| The lens element fit well, but I had to fill in some light gaps on the edges. |
 |
| Finished and painted film holder without the darkslide in place. |
 |
| The ground glass holder, the blue piece to the left is a piece of plexiglass with it's protective layer on. |
 |
| Completed ground glass with a piece of frosted acetate glued on so the image has something to focus onto, |
 |
| A side view of the camera's focus locking mechanism. I needed a way to lock both boxes after focusing was complete, |
 |
| A closer look at the mechanism |
 |
| The aperture tube and wood to make the aperture card slot that'll hold the aperture hole cards. |
 |
| Figuring out the correct size for each aperture stop, all products of the square root of 2, kind of neat how it works out. |
 |
| An aperture card with a f/64 hole cut into it. |
 |
| Finished and tested in place. I'll make about 5 aperture cards from f/16 to f/64 |
 |
| The installed aperture holder with aperture card. |
 |
| Initial construction of the front box. |
 |
| Side view of the camera before I installed the lens board and lens (bottom left) |
 |
| Initial stages of the film holder |
 |
| The front box painted on the inside. The black really soaks up light, no need for felt liner. |
 |
| Getting ready to mount the lens element into its plumbing fixture holder |
 |
| The mounted lens in place. |
 |
| About halfway through film holder construction |
 |
| The rear box and film slot being constructed |
 |
| Test fit with everything |
 |
| Both boxes in the initial stages |
 |
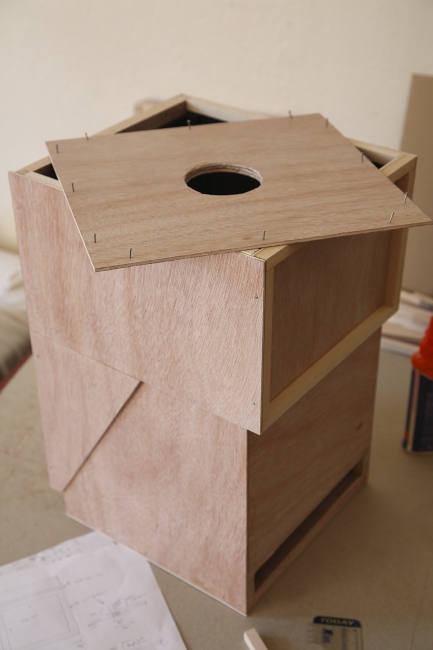
| Laying out the lens board for marking and cutting, you can see the rear box nesting inside. |
 |
| Starting on the first film holder, laying out and cutting the wood | | | |
|
|
|
Now go build something, it's fun!


No comments:
Post a Comment