10.08.2010

Camera Project - Part 2

I've now been working on this project for two weeks, and it's really taking shape.  The camera is essentially two boxes, nested together (see previous post for fun historical info).  Both sides are complete (minus the finish coat, not sure what that's going to be).  I designed and constructed the first film holder, which holds a single negative on each side, and put together the ground glass insert which fits into the same slot the film holder goes into and which the image is focused upon.  The holders have been by far the most complex items to design and build.  Each consisting of several layers of very thin wood slowly glued together to form a rail system where film is inserted behind a removable darkslide (which stays in place until the moment of exposure).  I've also finished building the aperture system.  Because it's a single element lens the apertures have to go in front of the lens roughly 1/7 the focal length.  I designed a card system where each card has a different hole aperture drilled/cut into it.  I merely slip the aperture I want into a slot I cut into an extension tube that fits snuggly over the lens (you'll see in the pictures below).  It's been designing, constructing, designing, constructing, repeat for awhile now.  I think most of that is finished and now it's time to move into the darkroom projects (or my small bathroom which will have some unique alterations).  Since I'm doing the entire process, from camera/lens construction to film/printing paper manufacturing I had to hunt down a chemical supply house and labware supply house.

Not being a chemist it's been an interesting two days making a grocery list of chemicals I need, from silver nitrate to potassium dichromate.  There's about 15 different chemicals I need, some are benign like milk lactose, while others are a bit nasty.  Not ever having a formal chemistry class it's been more than helpful having a very smart wife who can not only tell me how many oxygen atoms happen to be in sodium sulfite but can write out the chemical structure and tell me what happens when it's mixed with anything else on my list.  She is one smart cookie!  The funny part is I have to fill out a DEA form in order to get some of these, not sure what potassium iodide is used for other than to coat photographic paper with?

Initially I wanted to do this as a fun camera project, to build something that has real historical significance to my chosen career, a reaction to the ever increasing speed of digital media. I wanted to see if I could hand produce every aspect of the photographic process, from camera and lens to the negative and final print. Totally analog. To slow down each process to it's foundation of conception. When the negs take 4 hours to produce and dry, have to be shot within a few days, and where developing alone takes 2-3 hours (it's not a printing-out process, but is developed in a solution of Gallic Acid) I thought it would force me to see photography and the way I look through the lens in a new way. It has. Photography as an artistic medium is older that modern painting, yet the technology that produces it continually evolves whereas a painter today is essentially using 500 year old techniques. I noticed something interesting the other day, something we all do now, we look at the back of the camera after every shot. We now expect instant results and I truly think this dulls the external creative eye. How many times have you really taken the time to look, to watch and absorb the scene before you.  Slow down sometimes, it opens new creative pathways.  Stay tuned, more to come...

Process picture time! 
(not in construction order, sorry)
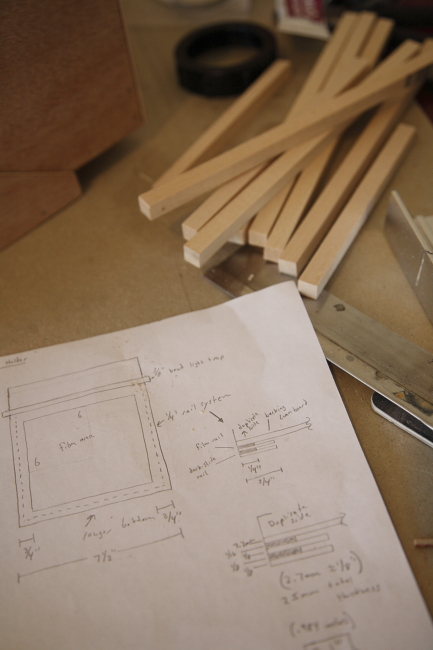
Laying out wood and designs for the film holder
More film holder work
Attaching the lens board to the front box
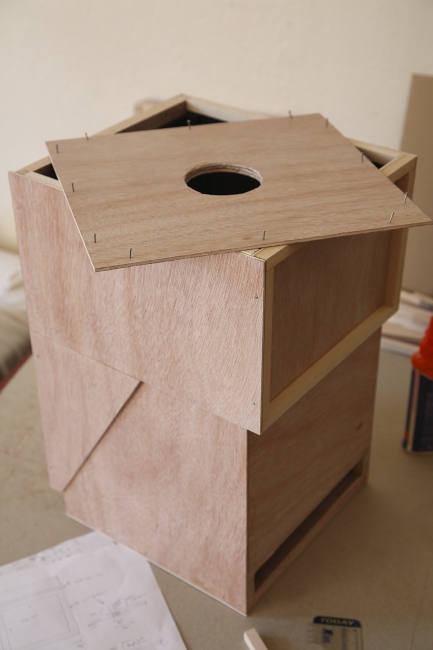
Prepping the front box for black paint on the inside, the rear box is standing on end, you can see the film slot.

All the layers of the film holder

It took three days to fully complete the film holder, I hope the others don't take as long, sheesh!

The lens element fit well, but I had to fill in some light gaps on the edges.

Finished and painted film holder without the darkslide in place.

The ground glass holder, the blue piece to the left is a piece of plexiglass with it's protective layer on.

Completed ground glass with a piece of frosted acetate glued on so the image has something to focus onto,

A side view of the camera's focus locking mechanism.  I needed a way to lock both boxes after focusing was complete,

A closer look at the mechanism

The aperture tube and wood to make the aperture card slot that'll hold the aperture hole cards.

Figuring out the correct size for each aperture stop, all products of the square root of 2, kind of neat how it works out.

An aperture card with a f/64 hole cut into it.

Finished and tested in place.  I'll make about 5 aperture cards from f/16 to f/64

The installed aperture holder with aperture card.


Initial construction of the front box.

Side view of the camera before I installed the lens board and lens (bottom left)
Initial stages of the film holder

The front box painted on the inside. The black really soaks up light, no need for felt liner.

Getting ready to mount the lens element into its plumbing fixture holder

The mounted lens in place.

About halfway through film holder construction

The rear box and film slot being constructed
Test fit with everything

Both boxes in the initial stages
Laying out the lens board for marking and cutting, you can see the rear box nesting inside.
 Starting on the first film holder, laying out and cutting the wood


Now go build something, it's fun!

9.29.2010

Camera Project - Part 1

I love building projects, tinkering with wood and metal, glues and last minute runs to the hardware store.  My latest project is something I've been wanting to do for awhile, to build a camera.  If I was going to build a camera I wanted to go all the back, to the very foundations of photography.  To have the whole process be 100% homemade.  A few years back I received a book on primitive photography as a Christmas present.  In it are designs for a sliding a box camera, simple lenses, paper negatives and salt prints (called Calotypes, more on that later).  This would be a perfect place to start.

The system the book laid out is the oldest camera system in the world, the very foundation of photography is based on it.  It's rather simple.  The camera is called a sliding box camera, essentially two nested boxes with the lens at one end and the film plane at the opposite end.  Focus is achieved by sliding the rear box in and out until an image is formed on a piece of ground glass.  What was revolutionary was the paper negatives that were used. Wax a piece of paper to make it translucent, soak it in a iodized bath solution and coat one side with a mixture of silver nitrate and glacial acid.  Contrary to popular belief this first photographic process gave you a dry negative, wet glass plates would come later.  This sensitized paper negative was then sandwiched on top of a piece of sensitized paper coated with a solution if silver nitrate and sodium chloride, and exposed to UV light to form a printed image that could be fixed and toned.  The negative could be used over and over again, creating the first negative/positive process, later to be replaced by the more popular one-off daguerreotype.
                                I found a piece of plumbing hardware that works perfectly as a lens housing.
                                Numbers, numbers, numbers...
After reading the book I noticed several inefficiencies in the author's design and decided to use the book as a guide on general principles but I would design the camera myself.  The lens for my camera would be a single element lens called a landscape lens.  To get the lens element I disassembled an old Nikon telephoto and extracted several elements, looking for what's called a positive meniscus (concave on one side, convex on the reverse).  After getting the element it took a fair bit of math to figure out the lens focal length, angle of view, format and eventual size of the camera.  Being my first home built camera I want to keep things size manageable and opted for a 6x6 inch format.  The lens element I extracted turned out to have a focal length of 354mm and a diameter of 48mm.  A few calculations later I found that it would work great for a format of 6x6 inches (remember, the 'normal' angle lens for any format is equal to its diagonal, my format has a diagonal of 217mm so my lens would be slightly longer angle). Having roughed in several drawings I got a good idea of what materials I needed and stalked up on luan 1/8 inch plywood and several styles of basswood. 

Now it's time to start putting the pieces together! Stay tuned!

9.03.2010

To Seek

The winds of time blow, slowly evaporating into the background of history.  What is it we all strive to seek, to find, to discover.  I stand at the precipice of a deep canyon and yearn to see the other side, a building thunderstorm obscures my view and I am left with emptiness of thought.  Why is it we continue to search the valleys of our soul for answers that may not be there.  I turn to the trees, the clouds, the rocks for understanding of the thing I cannot find from within.  My eyes continue to guide me deep into the recesses of creativity ever present before me, slightly out of reach, mocking me to answer it's call.  For what am I to do but give you the child of my work, born of interpretation of scene, balanced by tone and light.  Into the complex duality of life I find myself creeping deeper, hunting for the meaning of it all through the simple act of photographing trees while sitting on a fragrant patch of moss.  Perhaps there are no answers, only understanding.

6.02.2010

The City from Across

I shot this the other night on a beautiful evening hike up into the Marin Headlands. Click it, it gets bigger!

6.01.2010

Fear Not the Rain

A man, caught in a sudden rain en route, dashes along the road not to get wet or drenched. Once one takes it for granted that in rain he naturally gets wet, he can be in a tranquil frame of mind even when soaked to the skin.

The Hagakure (Behind the Leaves)

5.31.2010

Born a bit too Late...

I often feel I'm about a hundred and fifty years too late. I have a fascination with the mid 1800's, the time of enlightenment, Thoreau, scientific awakening, natural discovery and John Muir. Like most people I have idols, but mine are a bit different. Hesse, Thoreau, Feynman, Whitman, Abbey and John Muir, that most enlightened Scottish individual and his deep rooted need to wander the landscape, sketching its patterns and observing its wonders. I can relate. One of my favorite stories he wrote is of a little hike he took up Tenya Canyon in Yosemite Valley. It's a notoriously dangerous hike; exposed granite slabs, slippery descents, multiple rappels, class 4 scrambles. It's on my list. Today one needs permits, maps, fancy rope, the proper timing, etc, but with Muir all that was needed was a loaf of half-eaten bread and a journal. After entering Yosemite Valley he headed straight on towards the East end and Tenya Canyon. Traversing the lower section of the hike, littered with huge boulders and fast water he started the upper sections and took a nasty fall that knocked him cold and nearly took his life, cursing his feet telling them "that is what you get by intercourse with stupid town stairs, and dead pavement". Rather than retreat, he pressed on promising to "..guide my humbled body over the highest precipices and the most intricate and nerve-trying places.." Feeling confident that the last of the town-fog and been shaken from both head and feet he slept on a smooth granite boulder, munching stale bread and writing in his journal by the bright moonlight. To wander freely throughout that untouched beauty of place, sketching, noting seems to me as close to perfection as I guess there can be. 

5.25.2010

Obsession with Reality

What is this photographic obsession with reality.  Don't reproduce what was there, show me what you felt.

5.24.2010

The Pursuit of Knowable Excellence

One of my favorite photographic publications is a little known magazine called Lenswork.  It focuses solely on ideas rather than the technicals of photography.  Its editor, Brooks Jensen, does an outstanding job of selecting a myriad of portfolios to showcase each issue.  In the beginning of each publication he adds an editors note, which typically talks on a creative aspect within the medium of photography.  The lastest issue, #88, he expounded on an interesting idea I never fully embraced before, at least not from this perspective.  Excellence.  More specifically what is your personal approach to it.  Is it in the subtle play of print tones, the subject matter, the coverage or final presentation.  If the image content is the excellence than a carefully crafted physical print may be a moot point for you.  On the other hand, if beautiful tonality, rich in interplay is important than the final print is the pinnacle of your excellence.  It's a refreshing way to look at an unknown artists work.  Rather than ask yourself if you like an artists work, understand it or agree with it, ask yourself what's the artists definition of excellence.  Looking inward, my initial response to my own pursuit of excellence lies in showing you a feeling about yourself through my work.  Literal accuracy, coverage, even place doesn't really matter.  My aim is to have you feel the quiet of desert, the chill of night or some unknown memory that only you have that is drawn out through one of my images.  After my initial response though I find myself adding little things that I feel add to my pursuit of excellence.  A well exposed negative, two portfolio quality images on a single roll of 120, well crafted print tonalities, sharp image scans, excellence in technical execution, knowing exactly how an image was shot.  I guess I have a few definitions for myself, but I've never liked single responses anyway.  What's your pursuit(s) of excellence?
...go shoot an image, it's fun.

5.21.2010

Beautiful Kitchen

Interior project I photographed last week:
Location: Sunset Neighborhood San Francisco.
Architect: Steve Justrich
Stylist: Caitlin Morgenrath
Images:


5.20.2010

The Journey

For me the journey's the thing.  No, I'm talking about the eclectic eighties band, although I do love them as well.  I'm talking about the old adage of means versus the end, of destination versus the journey, and I dearly love the latter.  I'm a deep process person.  I find far more enjoyment in the doing than the achieving.  I've done a myriad of projects over the years and most now sit idly, but during I was consumed with the process.  In photography it is the act of photographing that drives me.  Of course you might say, but it's not that uncommon for photographers to find more enjoyment in the final outcome, the hung print or published magazine.  I could almost care less.  I want to be out shooting, wandering, observing.  When I was younger I had a recurring adventure I would play out on our property.  We had these rotting old stumps, cut old growth, that stood eight to ten feet high.  Being a space nut for as long as I can remember (The Right Stuff was the first movie I remember seeing in the theater) these stumps naturally became spaceships.  But rather than focus on the numerous adventure that this ship could take me on I spent more time building it, perfecting it.  I'm not entirely sure I had full blown adventure at all, I just liked redesigning my ship.  I had to have just the right designed engine, battery compartment and instrument panel.  When you make a declarative statement about yourself it's fun to examine how that thing has culminated in your being.  Two of my deep desires are to walk the length of the Pacific Crest Trail and to sail around the world, both of which are pure journey's at heart.  Books I adore are usually about self-discovery through a journey, either physical or artistic, or both.  Narcissus and Goldmund by Hermann Hesse being my favorite novel.  If you haven't read it, do, it's beautiful.  Thanks for listening.